Description
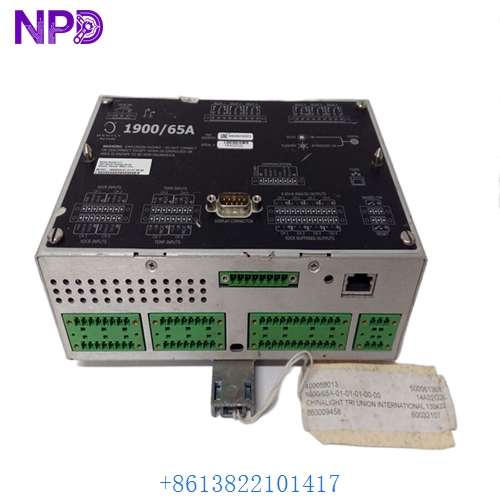
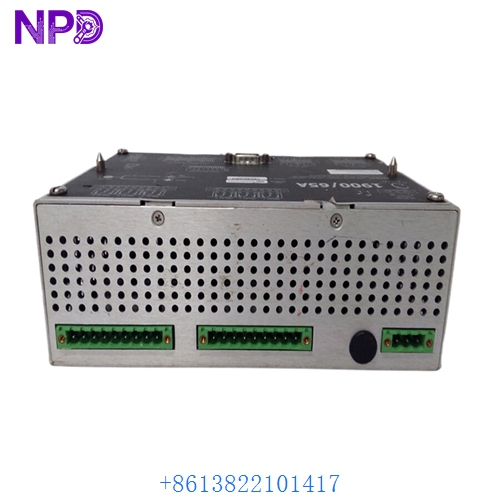
- Model: Bently Nevada 1900/65A-01-00-01-00-00
- Brand: Bently Nevada
- Series: 1900/65A Universal Equipment Monitor
- Core Function: Monitors vibration, temperature, and speed for rotating machinery
- Type: Equipment Monitor
- Key Specs: 4-channel input, field-configurable, 4-20 mA output
- Input Channels: 4 universal sensor inputs
- Sensor Compatibility: Vibration probes, accelerometers, velocity sensors, and RTDs
- Output Interfaces: 4 proportional 4-20 mA outputs, 4 alarm relay outputs
- Communication Protocol: Modbus RS-485 serial communication
- Operating Temperature: -20 °C to +70 °C
- Supply Voltage: +24 V DC (±10%)
- Mounting Style: DIN rail or panel mount
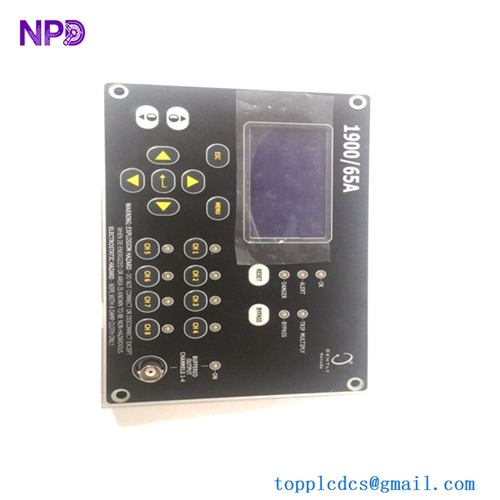
- Display Interface: Front-panel LCD display with LED alarm indicators
- Sampling Rate: Continuous real-time monitoring with configurable alarm delays
- Enclosure Rating: IP20
BENTLY 1900/65A-01-01-01-00-00
BENTLY 1900/65A-01-01-01-00-00

BENTLY 1900/65A-01-01-01-00-00
Installation & Configuration Guide
Phase 1: Pre-Installation (15 Minutes)
⚠️ Safety First:
- Notify operators of the planned maintenance window.
- Confirm the machine is in a safe state; shut down or bypass if necessary.
- Disconnect the +24 V DC power supply; use a multimeter to verify zero potential.
- Use an anti-static wrist strap to protect sensitive internal components.
Tools: PH1 Phillips screwdriver, precision flathead screwdriver, cable labels, and a multimeter.
Backup: If the system is still functional, download the existing configuration via RS-485 using the Bently configuration software. Document all DIP switch positions and wiring labels with high-resolution photos.
Phase 2: Removal (10 Minutes)
- Label all sensor inputs and relay outputs before disconnecting wires.
- Loosen terminal block screws and carefully remove wires.
- Release the DIN rail locking mechanism at the bottom of the module.
- Gently pull the module vertically away from the backplane. Inspect the backplane pins for signs of corrosion or bending.
Phase 3: Installation (15 Minutes)
- Verify the part number suffix matches the existing unit exactly.
- Crucial: Replicate the configuration. Set the DIP switches on the side of the new module to match your backup records. An incorrect setting here can lead to dangerous sensor signal errors.
- Align the module with the backplane connectors and press firmly until it clicks into place on the DIN rail.
- Reconnect the wiring based on your labels. Tighten terminals to approximately 0.5 N·m; do not overtighten to avoid damaging the terminal block.
Phase 4: Testing (20 Minutes)
- Power up the rack. Check for the “OK” LED on the front panel. If the red “ERR” light appears, power down and recheck your DIP switch settings.
- Connect the configuration software to verify that the raw values match the sensor inputs.
- If possible, perform a loop test using a vibration simulator to trigger alarm setpoints and ensure correct relay behavior.
- Record the replacement date and the new serial number in your maintenance log.
Customer Cases & Industry Applications
Case Study: Emergency Repair for Petrochemical Compressor
Situation: A major chemical plant in Eastern China operated a critical reciprocating compressor monitored by a Bently 1900/65A. During a seasonal temperature shift, the old monitor began exhibiting signal drift, leading to false alarms.
Task: Frequent false alarms forced operators to bypass the system, creating a significant safety risk. The client needed an immediate replacement to restore accurate monitoring.
Action: The client contacted us for a replacement unit. We supplied a brand-new 1900/65A and provided remote technical guidance to help their engineers successfully migrate the configuration parameters.
Result: After installation, vibration data stabilized, and false alarms were eliminated. The maintenance manager noted, “We expected a complex system overhaul, but your unit worked perfectly out of the box, saving us significant downtime and labor costs.”
Frequently Asked Questions (FAQ)
Q1: What does the suffix -01-00-01-00-00 mean? A: This code defines the specific hardware configuration, including power input, mounting style, communication protocols, and relay logic. Always ensure the suffix matches your requirements; incorrect suffixes may cause inverted alarm logic.
Q2: Is this compatible with the older 1900/65 version? A: The 1900/65A is an improved version. While physically similar, the firmware and advanced features differ. We recommend matching your existing model number exactly to ensure system stability.
Q3: Why are your prices different from cheaper “used” units on the market? A: Cheaper units are often refurbished or pulled from aging machines nearing the end of their lifecycle. We only supply Brand New Surplus stock, which provides the reliability required for critical safety-instrumented systems.
Q4: Can I use this without configuration software? A: Some settings might be stored in the module’s non-volatile memory, but we strongly advise using the Bently configuration software to calibrate sensors and verify the logic. It is the only way to ensure the safety of your machinery.
Q5: What if the module fails during the warranty period? A: We provide a 12-month warranty. Please document the failure with photos or video for our technical team. If a factory defect is confirmed, we provide a direct replacement. Note that damage from improper wiring or over-voltage is not covered.