
Description
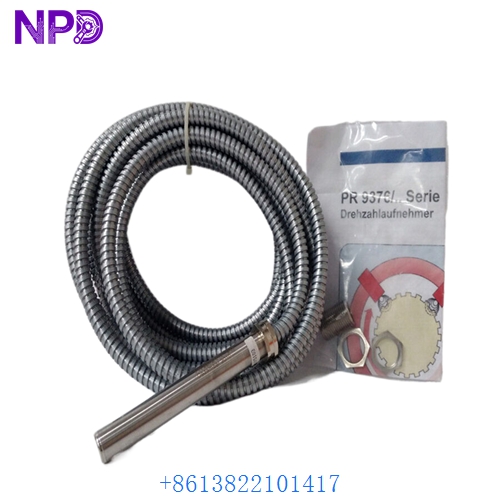
- Model: PR9376/010-011 (often written as PR9376010-011)
- Brand: EPRO (now part of Emerson / AMS)
- Series: PR9376 Inductive Displacement Sensors
- Core Function: Non-contact measurement of shaft vibration, axial thrust, and thermal expansion
- Product Type: Eddy Current / Inductive Probe
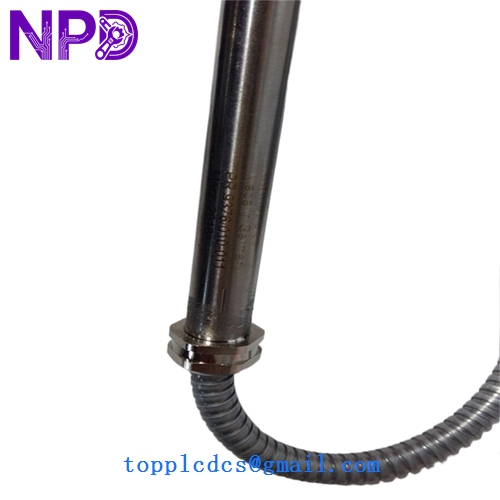
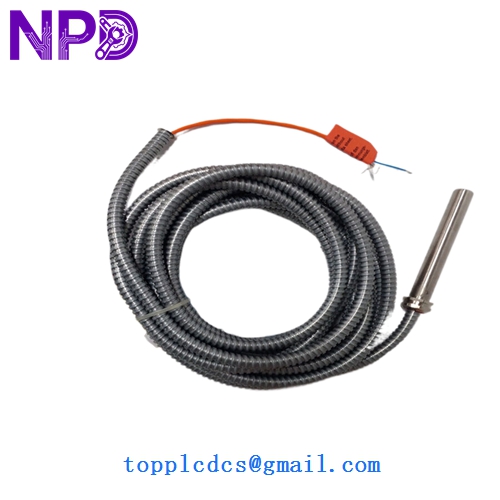
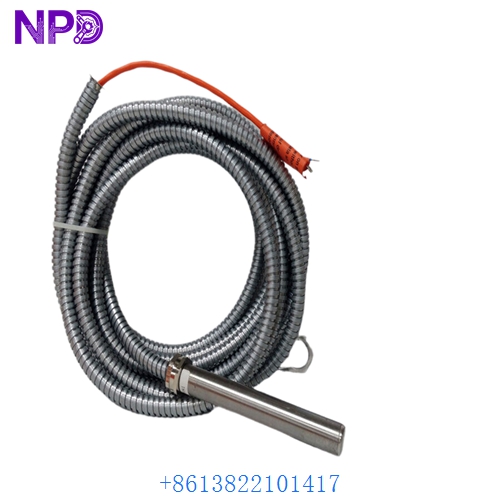
- Key Specs: 10mm Tip Diameter Extended Temperature Range Standard Threaded Body
- Measurement Principle: Eddy Current (Inductive)
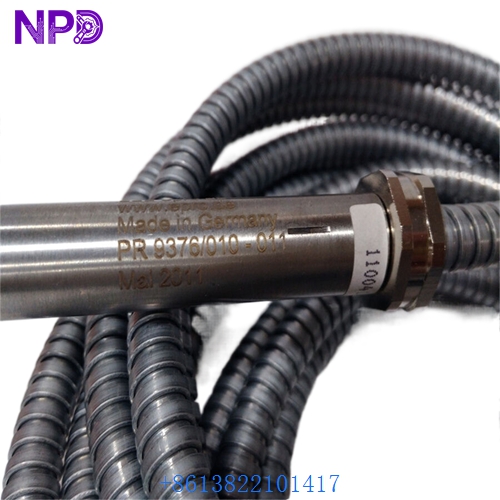
- Tip Diameter: 10 mm
- Linear Range: Typically up to 4.0 mm or 8.0 mm (system dependent)
- Sensitivity: Standardized for use with EPRO/Emerson converters (e.g., CON series)
- Thread Type: M14 x 1 or 3/8-24 UNF (check specific suffix for housing thread)
- Cable Type: Integrated coaxial cable with armored flexible conduit
- Operating Temperature: Up to +180°C (+356°F) at the probe tip
- Material: Stainless steel body with high-performance ceramic/PEEK tip

EPRO PR9376010-011
EPRO PR9376010-011
EPRO PR9376010-011
EPRO PR9376010-011
Application Scenarios & Pain Points
The PR9376/010-011 is a critical sensor for “Turbine Supervisory Instrumentation” (TSI). It is mounted through the bearing housing of massive steam turbines, gas turbines, or large centrifugal compressors. Unlike standard industrial sensors, this probe must survive constant immersion in hot lubricating oil and intense vibration.
The most common pain point is cable damage. Because the probe is often mounted in hard-to-reach areas, the coaxial cable can be pinched or melted during maintenance outages. A small nick in the cable changes the capacitance of the system, leading to “False Trips” or erratic vibration readings that can force an unnecessary emergency shutdown of the turbine.
Typical Application Scenarios:
- Axial Thrust Measurement Monitoring the longitudinal movement of a turbine shaft to prevent catastrophic contact between rotating blades and stationary diaphragms.
- Radial Shaft Vibration Detecting imbalance or bearing wear by measuring the high-frequency “orbit” of the shaft.
- Differential Expansion Tracking the relative growth between the turbine casing and the rotor during the startup (heating) phase.
- Eccentricity Monitoring Measuring “shaft bow” at low speeds to ensure the rotor is straight before bringing it to full operational RPM.
Case Study: The “Zero-Output” Mystery
Background: A power plant reported that their thrust position monitor was reading “Full Scale Negative” (meaning the shaft appeared to have vanished) after a planned bearing inspection.
Problem: We inspected the PR9376/010-011 and found the probe was physically intact. However, the technician had used an incorrect wrench to tighten the locknut, causing the probe body to twist slightly and snapping the internal connection between the tip and the coaxial cable.
Solution: Provided a replacement PR9376/010-011 and instructed the team on the proper “Gap Setting” procedure using a voltmeter.
Result:
- Accuracy Restored: The thrust monitor returned to a healthy 0.0 mm reading.
- Safety Guaranteed: The turbine was cleared for restart with full protective interlocks active.
- Engineer’s Insight: “Never rotate the probe body without first loosening the cable. If the cable twists, the internal wires will snap. Always use a ‘pigtail’ loop during installation to provide strain relief.”
Compatible Replacement Models
The PR9376 series is highly specific regarding tip size and cable length.
| Original Model | Replacement Model | Compatibility | Note |
|---|---|---|---|
| PR9376/010-011 | PR9376/010-011 | ✅ Exact Match | Standard 10mm probe. |
| PR9376/010-011 | PR9268 | ❌ Incompatible | PR9268 is a seismic velocity sensor; different tech. |
| PR9376/010-011 | AMS 6423 | ⚠️ Software | Newer Emerson version; check converter compatibility. |
Troubleshooting Quick Reference
| Symptom | Possible Cause | Relation | Quick Check | Action |
|---|---|---|---|---|
| Reading “Pegged” High | Open Circuit | ✅ High | Check for a cut in the coaxial cable. | Replace probe or repair connector. |
| Intermittent “Spikes” | Loose Connection | ✅ High | Ensure the SMA/BNC connector is tight. | Clean and tighten connectors. |
| Vibration at 0.0 always | Probe Gapped Too Far | ✅ High | Measure DC voltage at the converter. | Re-gap the probe closer to the shaft. |
| Noisy Signal | Ground Loop | ⚠️ Med | Ensure the probe shield is grounded at one end. | Inspect shield wiring and conduit. |
❗ Pro Tip: The “Voltage Gap” Rule
When installing a PR9376/010-011, don’t just “guess” the distance. Connect the probe to its converter and power it up. Rotate the probe until the DC output voltage reads exactly the manufacturer’s specified center-point (usually -10V DC for many EPRO systems). This ensures the sensor is in its most linear range for the most accurate vibration data.
Handling & Installation:
- Tip Protection: The ceramic tip is brittle. One accidental hit with a hammer or a drop onto a concrete floor will crack it, rendering the sensor useless.
- Minimum Bend Radius: Do not bend the armored cable sharply. Keep a minimum radius of 50mm to avoid damaging the internal coaxial conductor.
- Oil Sealing: Use high-quality thread sealant or O-rings if the probe is penetrating a pressurized oil housing to prevent leaks.