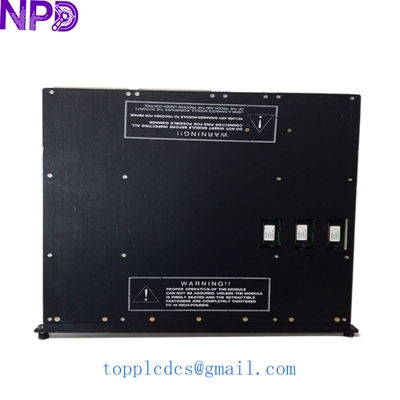

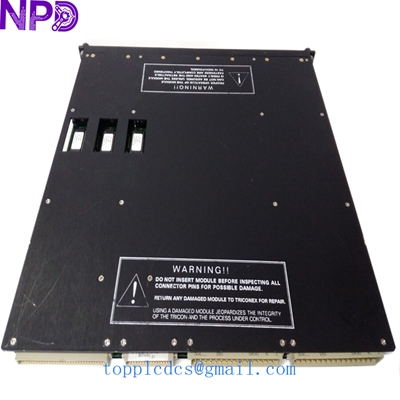
Description
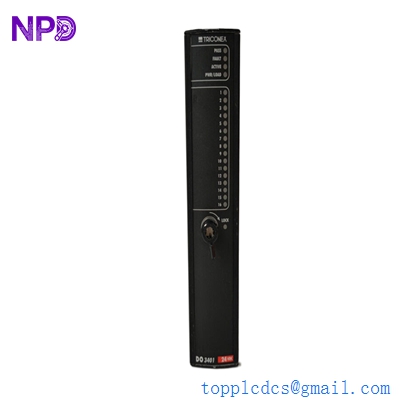
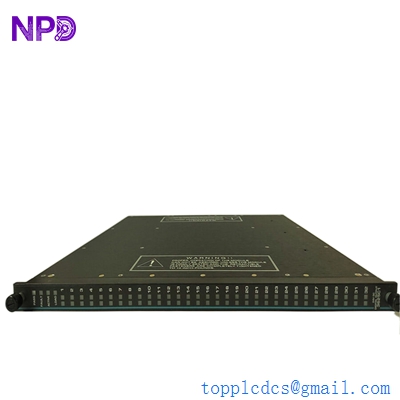
- Model: TRICONEX 3503E
- Brand: Schneider Electric (Triconex)
- Series: Tricon v9 / v10 / v11 Systems
- Core Function: Triple Modular Redundant (TMR) Digital Input Module
- Product Type: Digital Input (DI) Module
- Key Specs: 32 Channels | 24 VDC | Commoned | TMR Architecture
- Number of Input Points: 32 (non-isolated, commoned)
- Nominal Input Voltage: 24 VDC
- Input Voltage Range: 20 to 36 VDC
- Architecture: TMR (Triple Modular Redundant) with three independent legs
- Input Resistance: 2.8 kΩ (nominal)
- Filtering Time: 4 ms (typical)
- Status Indicators: Pass, Fault, Active, and individual point LEDs
- Self-Test Interval: Automatic continuous background diagnostics
- Point-to-Point Isolation: None (Commoned return)
- Safety Integrity Level: Suitable for SIL 3 applications
TRICONEX 3503E
Installation & Configuration Guide
Stage 1: Pre-Installation
⚠️ Safety Protocols:
- Safety System Warning: This module is part of a Safety Instrumented System (SIS). Modification can affect the safety loop. Ensure the process is in a stable, bypassed state before replacement.
- Keying Verification: Ensure the module’s physical keying matches the slot on the Tricon chassis. Never force a module into a slot.
- ESD Protection: Use a grounded wrist strap. The TMR circuitry is highly complex and sensitive to static.
Required Tools:
- Standard flat-head screwdriver (for terminal block screws)
- Triconex TriStation 1131 software (for configuration/monitoring)
- Multimeter (to verify field loop voltage)
Stage 2: Removal
Steps:
- Identify the Module: Confirm the “Active” and “Pass” LEDs. If you are replacing a faulty module, the “Fault” LED will typically be Red.
- Open the Latches: Simultaneously depress the top and bottom ejector tabs.
- Smooth Extraction: Pull the module straight out of the chassis guides.
- Inspect the Backplane: Ensure no dust or debris is present in the female connectors of the chassis.
Stage 3: Installation
Steps:
- Insert Module: Slide the 3503E into the guides until it meets the backplane.
- Seat the Module: Push firmly until the ejector tabs click into the locked position.
- Diagnostics Check:
- The Pass LED should turn Green after the power-up self-test.
- The Active LED will light up once the module begins communicating with the Main Processors (MP).
- Field Wiring: Connect the external 24 VDC loops to the corresponding External Termination Panel (ETP).
Stage 4: Power-On & Testing
Validation:
- TriStation 1131 Status: Open the diagnostic panel in TriStation. Verify that the module status is “Normal” and all three legs (A, B, and C) are voting correctly.
- Loop Check: Simulate a digital input signal from the field. Verify that the corresponding LED on the 3503E faceplate illuminates and the software registers the change from 0 to 1.
- Redundancy Test: The TMR architecture allows the module to function even if one leg fails. However, for a new installation, all three legs must be healthy.
TRICONEX 3503E
Customer Cases & Industry Applications
Case 1: Offshore Platform ESD System Recovery
Situation: An offshore oil platform in the North Sea experienced a “Leg Fault” on an existing DI module in their Emergency Shutdown (ESD) system. While the TMR architecture prevented a trip, the system was no longer fault-tolerant.
Task: The operator needed a 3503E immediately to restore SIL 3 compliance. OEM lead times were over 20 weeks.
Action: We shipped a New Surplus 3503E via priority air freight. The module was tested and certified in our facility before dispatch.
Result: The module was replaced during a scheduled maintenance window. System redundancy was restored to 100%, and the platform avoided a potential multi-million dollar production halt had a second leg failed.
Case 2: Chemical Plant Preventive Maintenance
Situation: A chemical processing plant was planning a major turnaround. Their aging Tricon v9 system had several modules approaching 15 years of service.
Task: The engineering team wanted to refresh their critical I/O modules to prevent “nuisance alarms” caused by aging components.
Action: We provided a bundle of five 3503E modules. By purchasing New Surplus, the plant saved 40% compared to new list prices while maintaining original factory quality.
Result: The turnaround was completed on schedule. The new modules provided a cleaner signal profile, reducing the diagnostic alarm frequency in the control room.
Frequently Asked Questions (FAQ)
Q: What is the difference between 3503E and 3504E? A: The 3503E is a 24 VDC Commoned Input module, whereas the 3504E is typically used for 24/48 VDC High-Density applications with different isolation characteristics. Always check your ETP (External Termination Panel) compatibility before switching models.
Q: Can I hot-swap this module? A: Yes, Triconex modules are designed for hot-swapping. However, in my experience, it is critical to ensure that the “Passive” module is the one being pulled if you are working with a redundant pair. For a TMR slot, the system will continue to run on the remaining two legs while the module is out.
Q: Does this module require a specific software version? A: The 3503E is supported by most versions of TriStation 1131. However, if your system is very old (v6 or v7), you should verify the firmware compatibility with the Main Processors.
Q: How do you guarantee the quality of New Surplus? A: We don’t just “box and ship.” Every 3503E undergoes a visual inspection for pin integrity and a powered-up diagnostic test to ensure the “Pass” LED stays green and all 32 channels are responsive.
Featured Inventory List (Current Stock)
- TRICONEX 3625 Digital Output (TMR)
- TRICONEX 3721 Analog Input (TMR)
- TRICONEX 3008 Main Processor
- ABB PM866 Controller
- Bently Nevada 3500/22M
- GE IS215UCVEH2AE
- Honeywell CC-PAIH01
- Siemens 6ES7 417-4XT05-0AB0
For more details on these parts, visit our catalog at newplcdcs.