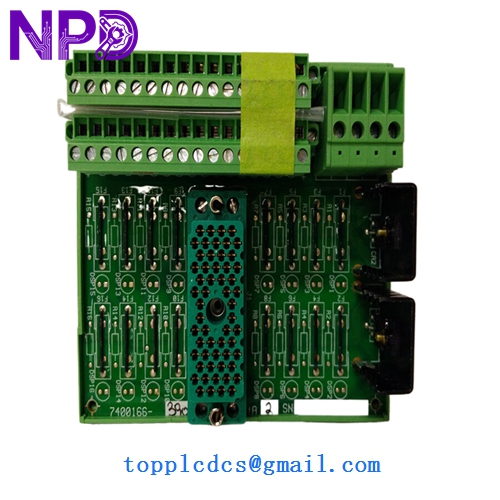
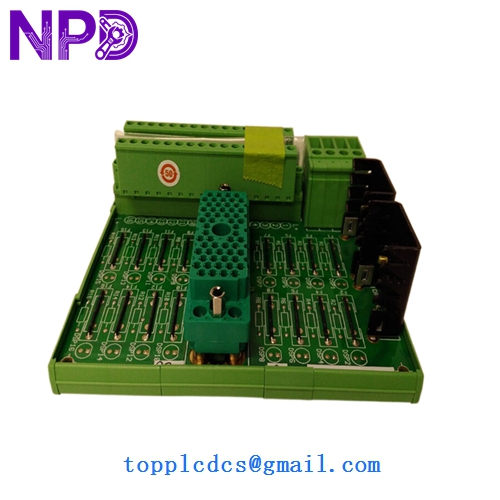
Description
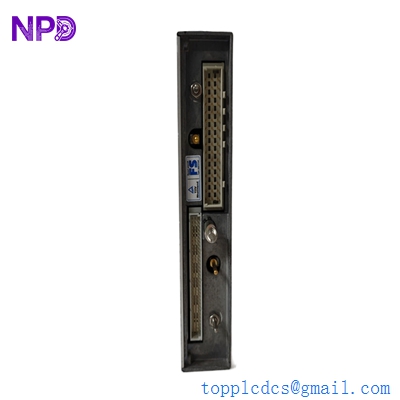
- Model: 9662-610 (3000520-390C1R)
- Brand: Triconex (Schneider Electric)
- Series: Tricon Triple Modular Redundancy (TMR) System
- Core Function: High-speed I/O Bus Expansion between chassis
- Condition: New Surplus (Original original, non-refurbished, verified serials)
- Type: Bus Expansion Module (Standard)
- Key Specs: Multi-chassis communication | TMR architecture support
- Function: Extends the TriBus and I/O bus from the Main Chassis to Expansion Chassis
- Architecture: Triple Modular Redundant (TMR) – internally 3-2-1 voting compatible
- Compatibility: Tricon v9 and v10 systems
- Connector Type: High-density backplane interface
- Isolation: Optically isolated communication paths
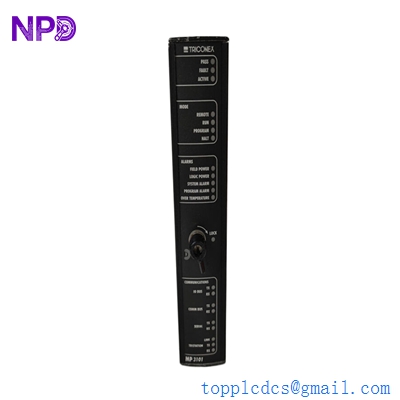
- Diagnostics: Front-panel LED indicators (PASS, FAULT, ACTIVE)
- Power: Derived from the Tricon Backplane (5 VDC)
- Transmission: High-speed parity-checked data transfer
- Mounting: Dedicated Bus Expansion slots in Tricon Chassis
- Environmental: Conformal coated for harsh industrial environments
3000520-390C1R
3000520-390C1R
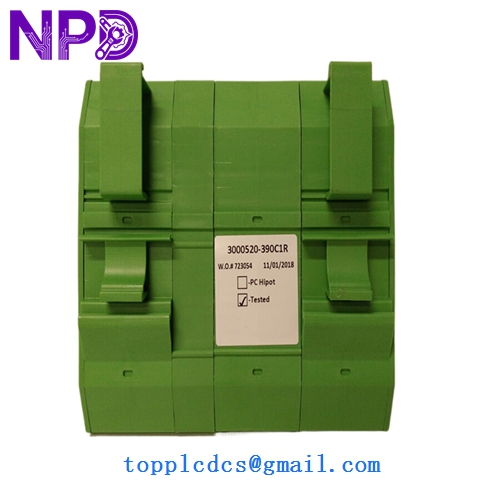
3000520-390C1R
Installation & Configuration Guide
Phase 1: Pre-Installation (15 Minutes)
⚠️ Safety Warning:
- This module facilitates communication across the entire safety rack. A failure here can cause a “loss of visibility” for multiple I/O racks.
- Confirm if the system is “Simplex” or “Dual/TMR” expansion. If it’s a Simplex expansion and you pull the only working module, you will trip the associated I/O.
- Use a grounded ESD wrist strap.
Phase 2: Removing the Old Module (5 Minutes)
- Loosen the top and bottom retaining screws on the 9662-610.
- Note on Cables: If there are I/O bus cables attached to the front or the adjacent I/O bus connectors, label them clearly before removal.
- Use the module handles to pull the unit straight out. Do not rock the module as this can damage the high-density backplane pins.
Phase 3: Installing the New 9662-610 (15 Minutes)
- Pin Inspection: Closely examine the backplane pins on the New Surplus module. Even one bent pin can cause a “Comm Fault.”
- Seating: Slide the module into the designated slot. Apply firm pressure to ensure the backplane connectors are fully mated.
- Cable Reconnection: Reattach the I/O bus expansion cables. Ensure the connectors are fully seated and the thumb-screws are hand-tight.
Phase 4: Validation (15 Minutes)
- LED Sequence: – PASS: Should light green after the internal self-test.
- ACTIVE: Should light green once the Main Processor (MP) establishes communication with the expansion rack.
- TriStation 1131 Check: Open the Diagnostic Monitor. Ensure the “Expansion Chassis Status” shows “Healthy.”
- Error Clear: If a “System Alarm” persists, you may need to “Acknowledge” the hardware change in the software.
Customer Cases & Industry Applications
Case 1: LNG Terminal Communication Failure An LNG loading terminal experienced intermittent “Rack 2 Offline” alarms. Diagnostics pointed to a failing 9662-610 module in the main chassis. Because the expansion rack controlled the emergency shutdown (ESD) valves for the loading arms, the terminal was at risk of a total operational halt. We provided a New Surplus module via “Hand-Carry” service. The module was replaced during a 1-hour maintenance window, restoring full TMR communication integrity to the remote racks.
Case 2: Refinery Expansion Project Overrun During a refinery expansion, a system integrator found that the original bill of materials missed two bus expansion modules needed for an additional I/O chassis. Schneider Electric quoted a 20-week lead time. We supplied two 3000520-390C1R units (New Surplus) within 5 days. This allowed the integrator to complete the loop checks on schedule, avoiding a $50,000 per day penalty for late commissioning.
Frequently Asked Questions (FAQ)
Q: What is the difference between the 9662-610 and the 9662-110? A: In my experience, the -610 is the newer, improved revision with better noise immunity and updated internal components compared to the older -110. While they are often functionally compatible, you should always try to match the revision level across all three legs of a TMR system to ensure perfectly balanced timing.
Q: Can I replace this module while the system is running? A: If your Tricon is configured for TMR (Triple Modular Redundancy) and you have redundant expansion paths, yes, it is hot-swappable. However, if this is the only expansion path to a chassis, pulling it will cause that chassis to go “Brain Dead.” Check your system topology first.
Q: Why do I see the “3000520-390C1R” number on the sticker instead of 9662-610? A: Triconex often uses different numbers for the “Assembly” (3000520…) and the “Sales Model” (9662-610). Rest assured, they refer to the same physical hardware. We verify both numbers during our QC process.
Q: Do I need to re-program the MP after installing this? A: No. The 9662-610 is a “transparent” communication module. As long as the slot and chassis configuration in TriStation matches the physical hardware, it will start working as soon as the MP recognizes it.
Q: How do you guarantee the quality of a “New Surplus” bus module? A: We don’t just look at it; we put it in a test rack. We verify data throughput and signal integrity across all three internal paths using a dedicated Tricon v10 test bed. We can provide the Test Report and photos of the pins before we pack it in anti-static foam.