
Description
- Model: VMIVME-7750-746000 (Alternate Part Number: 350-027750-746000)
- Brand: GE / Fanuc / VMIC (Abaco Systems)
- Series: Intel Architecture VMEbus Single Board Computer (SBC) Series
- Core Function: High-Performance Embedded Single-Slot Industrial Processor
- Condition: Brand New Surplus (Unused factory-sealed/warehouse stock with original component integrity)
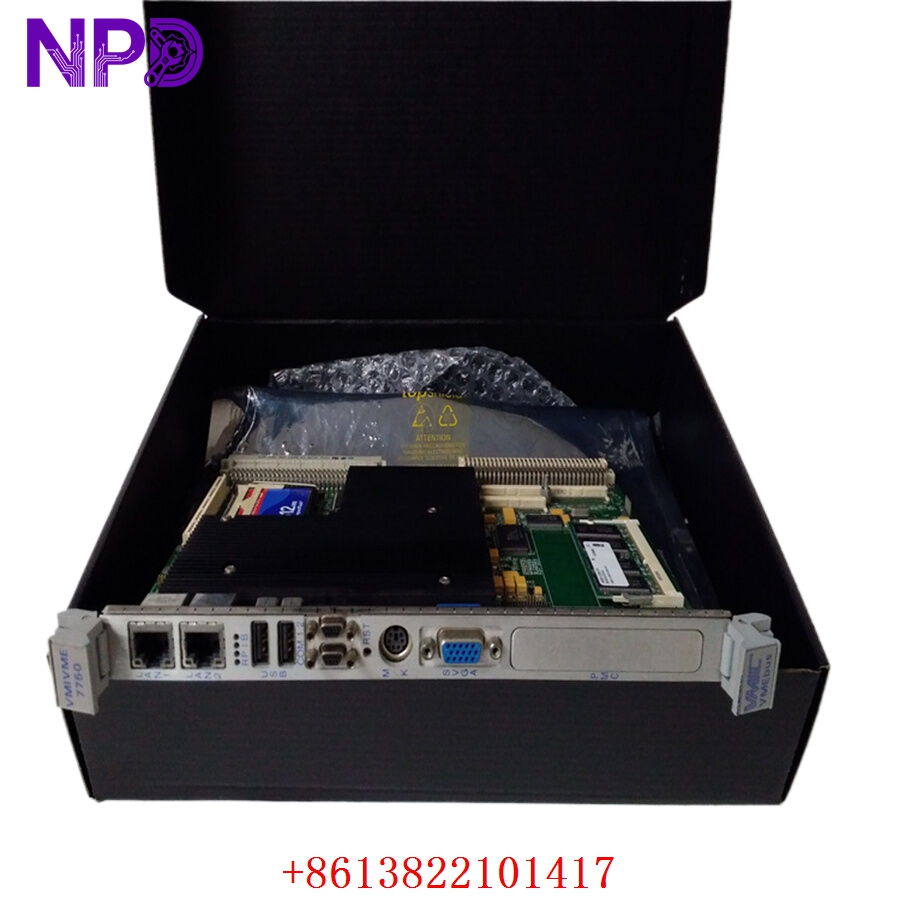
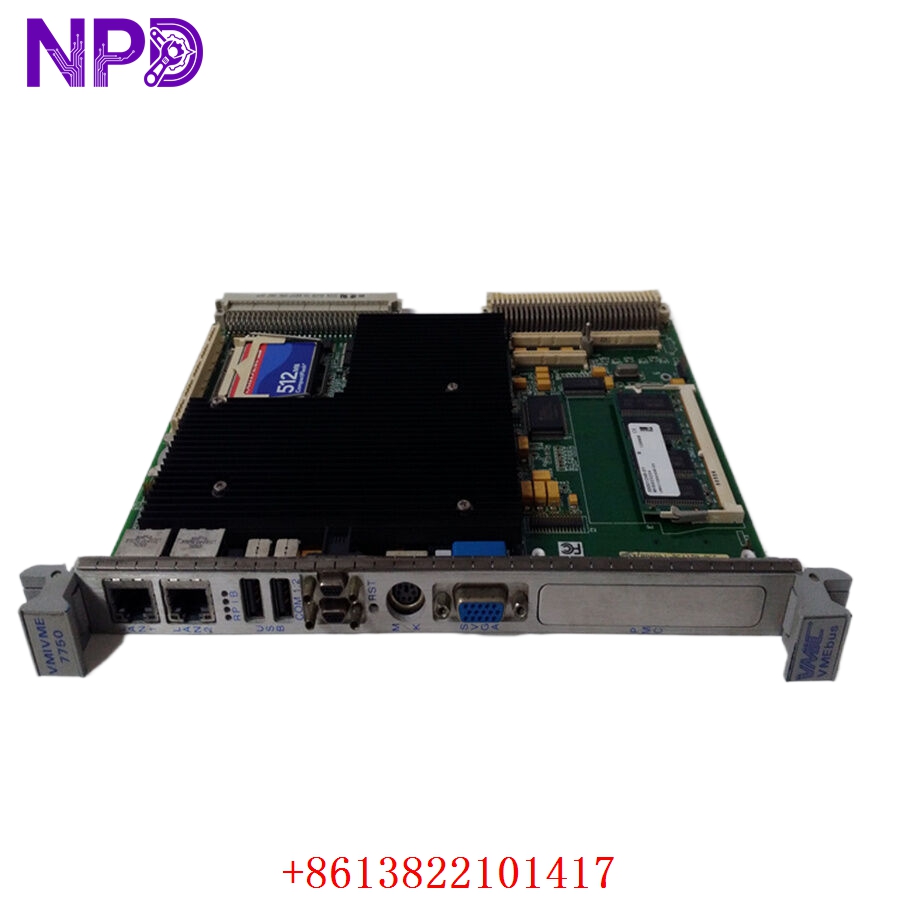
- Product Type: 6U VME Single Board Computer
- Key Specs: 1.26 GHz Intel Pentium III Processor | 512 MB PC133 SDRAM | Dual 10/100BaseTX Ethernet | Tundra Universe II VME Interface | 32 KB Nonvolatile SRAM
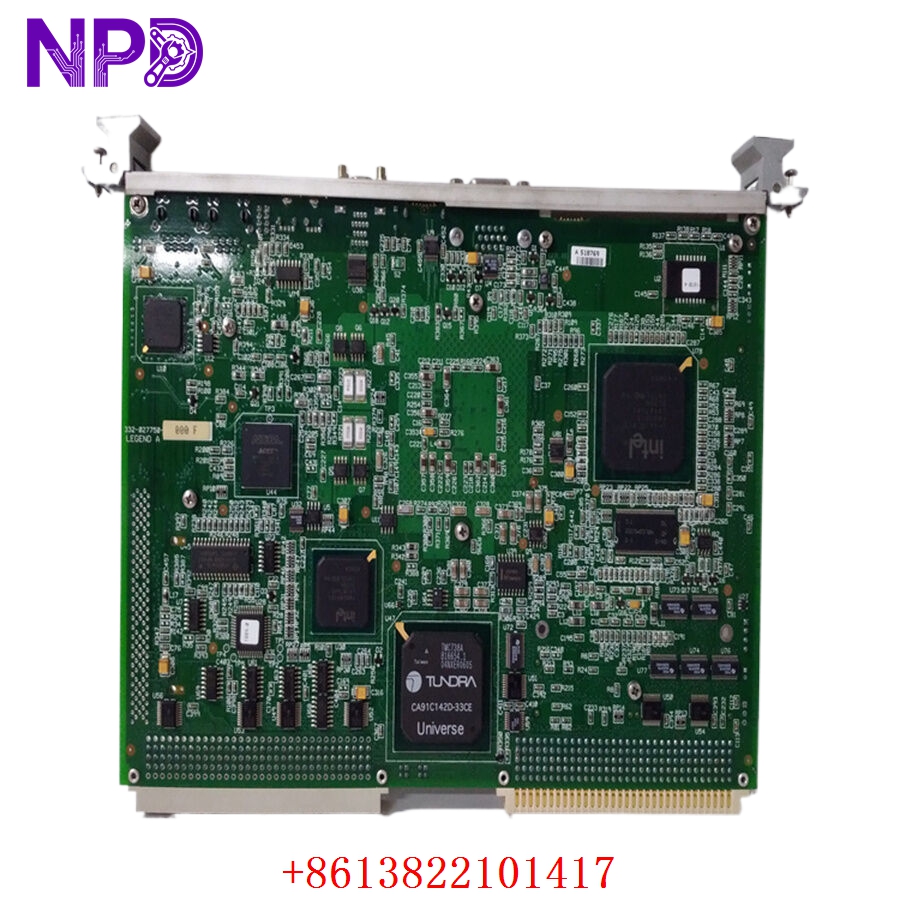
- Processor Core: Powered by an Intel Pentium III microprocessor operating at speeds up to 1.26 GHz. Features a 133 MHz system bus running on the Intel 815E chipset with 512 KB advanced transfer L2 cache working at full processor speed.
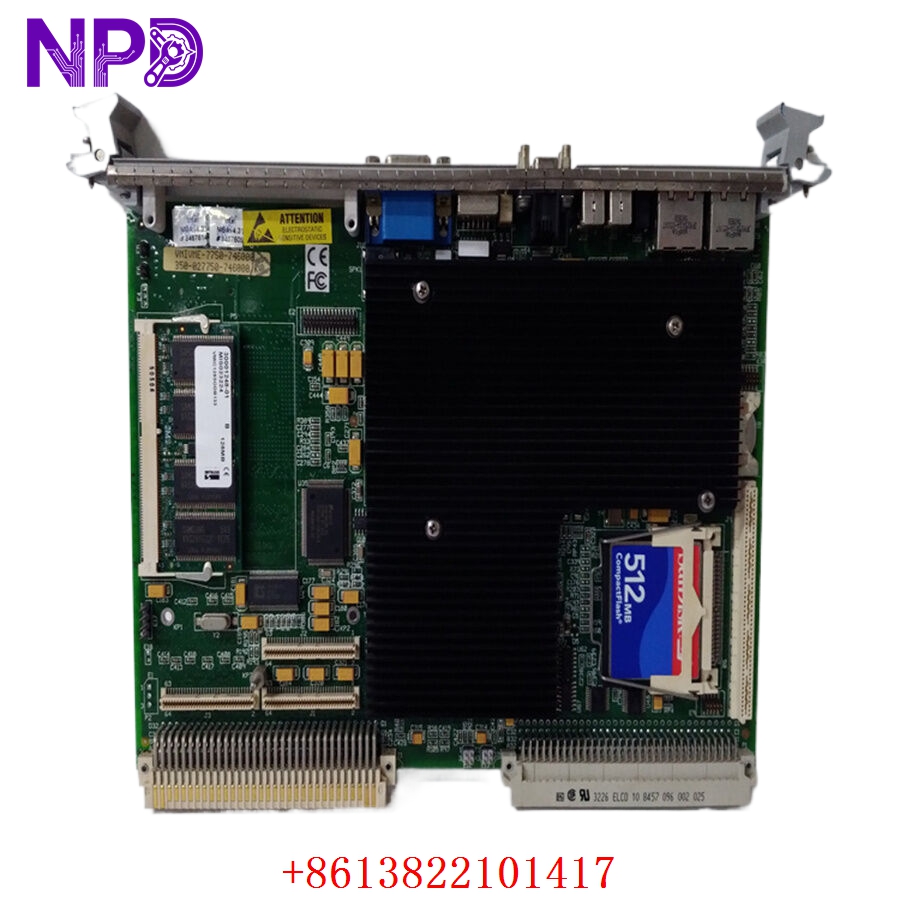
- System Memory: Integrated 512 MB PC133 SDRAM via a single 144-pin SODIMM slot, providing reliable data handling for complex runtime processing.
- Storage Interfaces:
- Supports up to 1 GB of CompactFlash memory via the secondary IDE port.
- Native IDE and Floppy drive support routed for easy system backup and file transfers.
- Networking & I/O:
- Dual independent 10/100 Mbit Ethernet interfaces (Intel 82559 and internal ICH2 controllers) via front panel RJ45 connectors. Supports remote network booting (Lanworks BootWare).
- Two 16550-compatible RS-232 serial ports accessible on the front panel.
- Dual USB ports (v1.1 compliant) and dedicated PS/2 Keyboard/Mouse connectivity.
- Graphics Controller: Internal AGP SVGA graphics controller featuring 4 MB display cache, supporting crisp screen resolutions up to 1,600 x 1,200 x 256 colors.
- VMEbus Master/Slave Interface: Built around the Tundra Universe II PCI-to-VME bridge chip. Offers robust compliance with VMEbus Rev. C.1 standard (A32/A24/A16 addressing modes, D32 data path, and block transfer protocols BLT32/BLT64).
- Onboard Security & Clocks:
- 32 KB Nonvolatile SRAM (NVRAM) preserves essential configuration metrics during complete power dropouts.
- Features a hardware watchdog timer and real-time clock/calendar backup.
- Form Factor: Standard VME 6U single-slot footprint (233.4 mm \times 160 mm \times 20.3 mm).
GE VMIVME-7750-746000
GE VMIVME-7750-746000
GE VMIVME-7750-746000
Installation & System Setup Guide
Phase 1: Pre-Installation Configuration (Estimated Time: 15 minutes)
⚠️ Hardware Warning: Embedded VME processing boards are highly sensitive to Electrostatic Discharge (ESD). Always wear an anti-static wrist strap clipped to a verified grounding point before opening the protective shielding bag.
Required Tools:
- Static-dissipative workbench mat
- ESD wrist strap
- Flathead driver for chassis captive locking screws
- Micro-prying tool or tweezers (for physical jumper adjustment if changing onboard boot source)
Phase 2: Hardware Slot Preparation (Estimated Time: 10 minutes)
- Power Down the Chassis: Ensure the VME rack main power supply is switched completely off. Never insert or extract a single-board computer into a live VME backplane; hot-plugging can damage the pins and destroy the board circuitry.
- Select the Slot: Ensure you are inserting the board into Slot 1 if it is intended to act as the VMEbus System Controller (enabling the VMEbus arbiter and clock generation), or a regular master slot for secondary computing loops.
- Inspect the Backplane: Ensure the P1 and P2 backplane connector rows are entirely free of dust, debris, or bent alignment teeth.
Phase 3: Physical Insertion (Estimated Time: 10 minutes)
- Align the Rails: Align the top and bottom edges of the VMIVME-7750 module with the plastic card guides inside the 6U rack space.
- Seat the Connectors: Gently push the module inward until the rear P1 and P2 high-density pin groups touch the female sockets on the backplane.
- Engage the Levers: Press the front ejector handles firmly inward to drive the single-board computer securely home. You will feel a distinct click once the pins seat completely.
- Secure Faceplate Screws: Tighten the top and bottom faceplate retention screws to ensure the module stays bonded to the rack chassis frame during equipment vibration.
Phase 4: Initial Boot & Verification (Estimated Time: 25 minutes)
- Connect Local I/O: Plug your SVGA monitor into the front display port and hook up a standard keyboard to verify initial boot configuration metrics.
- Apply System Power: Switch on the main VME chassis power supply.
- Monitor Front LED Array & Post: Watch the front panel indicator lights. The system will start its Power-On Self-Test (POST).
- Enter BIOS Setup: Press the designated hotkey (typically DEL or F2) on your keyboard during early initialization to enter the BIOS configuration pages.
- Verify Memory and Storage Detection: Confirm that the full 512 MB SDRAM profile and the secondary CompactFlash or IDE target array show up correctly in the hardware map. Save changes and exit to load your chosen real-time operating system environment (e.g., VxWorks, Windows XP Embedded, or Linux).
Frequently Asked Questions (FAQ)
Q1: What operating systems are natively compatible with the VMIVME-7750 series?
A: The processor is highly versatile because it retains standard desktop-compatible memory and I/O maps. It works reliably with industrial real-time operating systems (RTOS) like VxWorks, QNX, LynxOS, and Solaris, as well as general-purpose architectures like Windows XP/NT and Linux distributions.
Q2: What function does the Tundra Universe II chip perform on this card?
A: The Universe II serves as the underlying bridge between the local 32-bit PCI internal bus and the main VMEbus backplane architecture. It enables high-speed data transfers, handles hardware interrupts across the rack, and lets the board act as either a VME system master controller or an addressable slave module.
Q3: How does the onboard NVRAM protect system data during a blackout?
A: The VMIVME-7750-746000 includes 32 KB of nonvolatile SRAM. This specialized memory area is continuously backed up by an independent hardware cell. When main power drops below operating margins, critical status registers, system identifiers, and process steps are written and frozen here to protect against data corruption.