Description
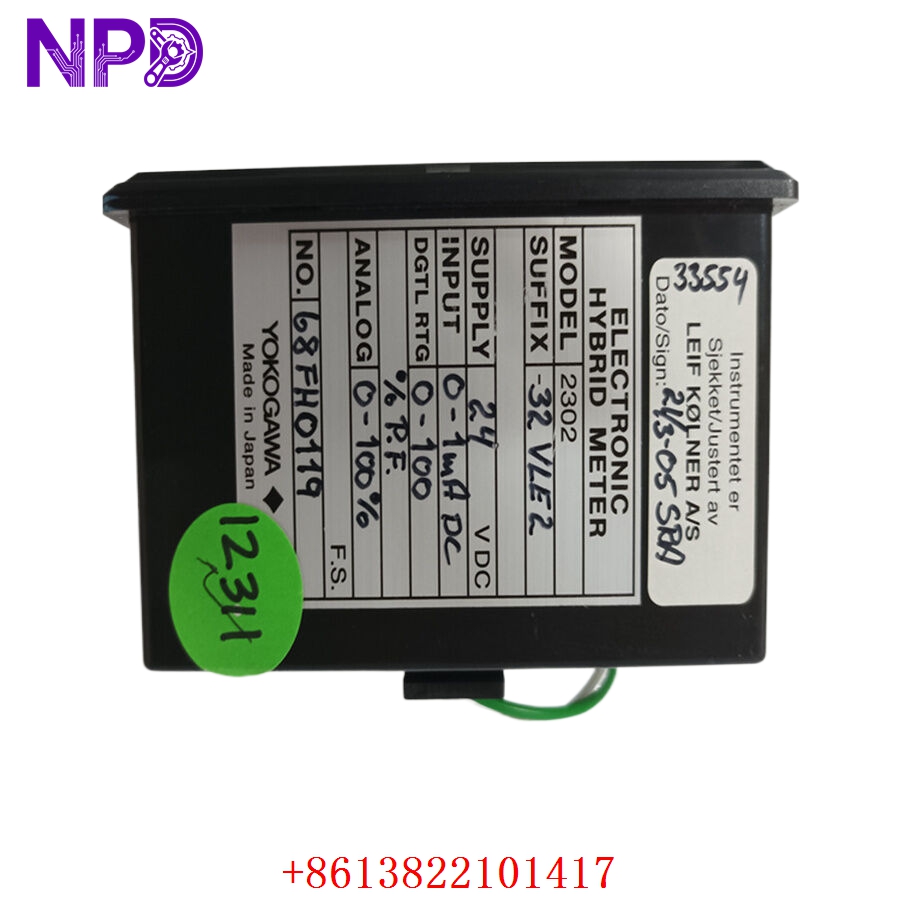
- Model: Yokogawa 2302-32-VLE-2 (Model 2302, Suffix -32 VLE 2)
- Brand: Yokogawa Electric (Japan)
- Series: 2302 Electronic Hybrid Meter Line
- Core Function: Provides simultaneous analog scale and digital readouts of loop process variables, Original New Surplus condition
- Type: Electronic Hybrid Panel Meter / Indicator
- Key Specs: 24 V DC Power Supply | 4-20 mA or 0-1 mA DC Input Options | Dual Digital/Analog Scale
- Operating Power Input: 24 V DC (\pm10\%)
- Standard Analog Signal Input: 4-20 mA DC or 0-1 mA DC configuration options
- Digital Scale Rating: 0-315 A \times 10 (Custom scale configurations supported per suffix code)
- Analog Progress Bar Display: 0% to 100% full-scale deflection line
- Enclosure Architecture: Standard square panel cutout mounting configuration
- Internal Backlight Illumination: Integrated long-life status illumination bulb/LED assembly
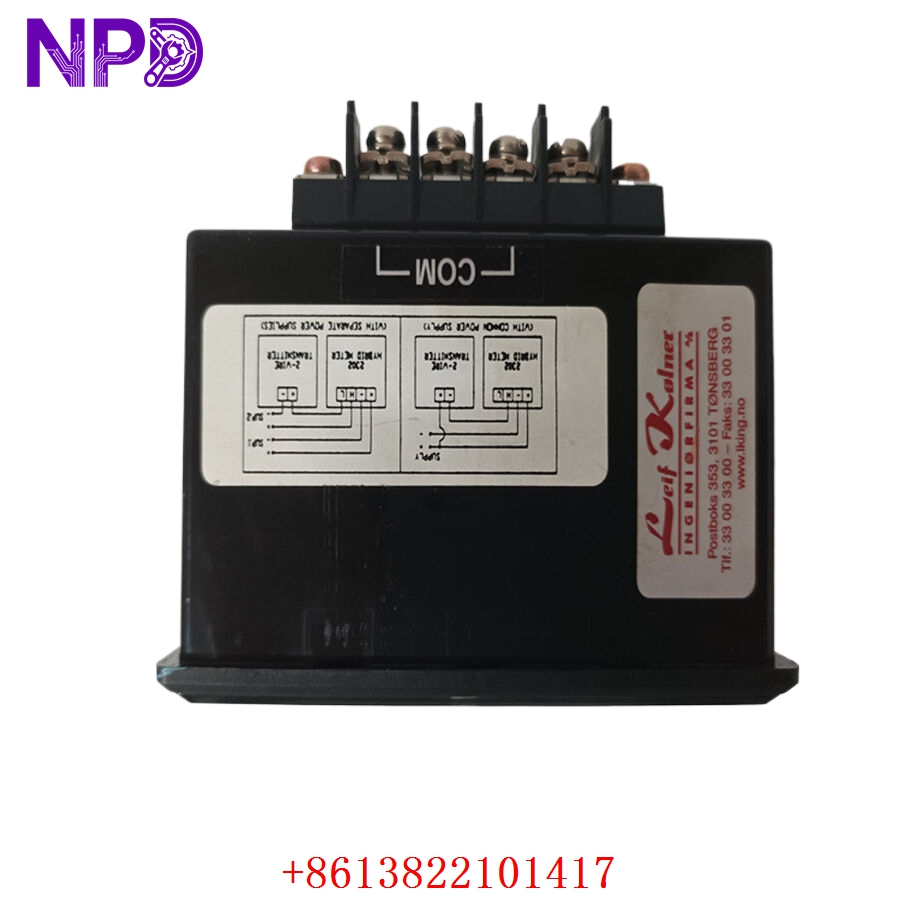
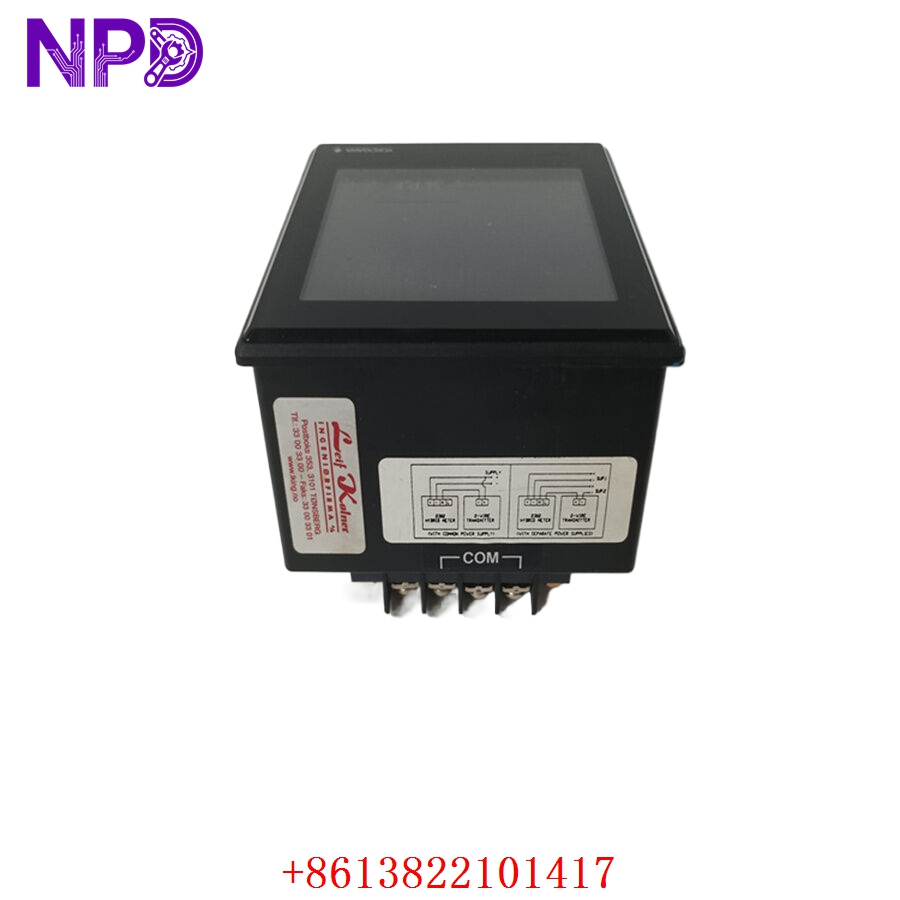
- Communication Link: Basic serial interface/Modbus tracking mapping (select variations)
- Ingress Protection Level: IP40 (Front panel array frame)
- Operating Ambient Limits: -10 °C to +50 °C (Non-condensing moisture states)
- Connection Interface: Rear-facing screw terminal block assemblies
Part 4: Installation & Configuration Guide
Phase 1: Pre-Installation (Estimated Time: 15 minutes)
⚠️ Safety First:
- Contact control room supervision to pull the target monitoring loop out of active automatic cycle control.
- Confirm that the specific auxiliary 24 V DC instrument distribution circuit breaker is safely disconnected.
- Apply standard Lockout/Tagout (LOTO) protection to the instrument panel circuit supply lines.
- Wait a brief 2-3 minutes to allow any line filters or internal power supply decoupling circuits to drop their low-level charge completely.
Tool Preparation:
- Anti-static wrist grounding strap and clean work pad
- Miniature flat-tip terminal screwdriver (M2 size)
- Precision wire stripper tools
- Fluke 115 Digital Multimeter
- Device label tags and a mobile phone camera
Backup Procedures:
- Log the full scale and multiplication settings shown on the existing dial plate (e.g., 0-315 A x 10 or 0-300 bar scale configurations).
- Take clear close-up photos of the rear-facing terminal block array to register exact loop polarity and backlighting supply pairs.
Phase 2: Removal (Estimated Time: 10 minutes)
Steps:
- Use your multimeter to verify that zero voltage remains active across the 24 V DC power terminal blocks on the back of the chassis.
- Back out the rear terminal retaining screws slowly. Carefully detach the 4-20 mA current loop wiring lines.
- Wrap temporary insulation or label tags on the bare wire ends immediately to prevent cross-contact shorts.
- Loosen the metal panel mounting brackets flanking the sides or rear of the meter shell.
- Push the meter chassis forward slowly out through the front panel square cutout.
- Clean away old foam compression gaskets or chemical particulate scale from the panel frame.
⚠️ Key Notes:
- If the existing loop is a live 4-20 mA signal driven from a centralized source, disconnecting this meter without short-bridging or disabling the loop will break the signal path, which can cause upstream DCS alarm system trips.
Phase 3: Installation (Estimated Time: 15 minutes)
Steps:
- ESD Protection: Connect your anti-static wrist strap before handling the replacement 2302-32-VLE-2 instrument out of its sealed container box.
- Scale Alignment: Verify the front plate scale markings match your processing profile criteria exactly before mounting the piece.
- Panel Seating: Slide the hybrid meter straight through the front panel layout hole, making sure the integrated anti-dust seal seats flat against the surface.
- Bracket Anchorage: Slide the side mounting clamps along the outer chassis channels, tightening the lock screws evenly until the casing is clamped securely to the panel frame.
- Re-wiring Lead Steps: Match the signal loop polarity back to the terminal pins (+ and – terminals). Run the 24 V DC auxiliary operating lines to their designated pins, ensuring the screws are securely tightened to prevent any loose connections down the road.
Self-Check Checklist:
- [ ] The front-facing dial plate parameters match your processing system limits exactly
- [ ] Signal loop input polarity checks out as correct with zero inverted wires
- [ ] The housing compression brackets are tightened flush with no gaps around the seal
- [ ] All tool pieces are removed from the back auxiliary wire racks
Phase 4: Power-On & Testing (Estimated Time: 15 minutes)
Pre-Power Checks:
- Probe the isolated input line using your multimeter to check for any unexpected short circuits to ground before turning the system back on.
Power-On Steps:
- Flip the 24 V DC auxiliary instrument power supply breaker back on.
- Monitor the hybrid meter display panel interface. The digital segment line should initialize instantly, and the backlighting array should illuminate.
- Signal Calibration: Inject a steady 4 mA baseline calibration current into the input loop line. The analog progress indicator bar must sit precisely at 0%, and the digital numerical value should clear to its low-limit value.
- Increment the test input feed up to a full 20 mA signal. Check that the analog progress bar deflects cleanly to 100% and that the digital window reads out the top-scale value (e.g., 315 or 300 depending on your scale setup) without jumping or flickering.
- Return the loop wiring back to the operational configuration and observe live process tracking for 15 minutes to confirm stable monitoring.
- Record the replacement module’s serial number into the control room’s shift maintenance log.
Part 5: Customer Cases & Industry Applications
Case 1: Marine Engine Room Control Panel Recovery
Situation:
An international cargo vessel equipped with an specialized automation setup experienced a power surge while out at sea. The local monitoring console panel in the main engine room suffered minor damage, and an essential 2302-32-VLE-2 electronic hybrid meter tracking main generator line current fried its internal processing board, leaving the crew without a visible amp readout on the main dashboard.
Task:
The engine room crew had to resort to manually checking core stats via a handheld multimeter probe during scheduled shifts, which increased the risk of missing an unexpected load imbalance. Because Yokogawa had categorized this product generation as legacy equipment, the shipping line’s standard procurement agent faced weeks of transit delay to track down a matching unit from global marine depots.
Action:
The vessel’s maintenance manager contacted our regional warehouse. We located a pristine, un-used surplus 2302-32-VLE-2 panel meter inside its original protective packaging. We ran an on-bench input simulation from 4-20mA across the entire scale to confirm perfect calibration, and then hand-delivered the unit directly to the ship’s port agency logistics broker for priority tracking.
Result:
- Downtime Eliminated: The replacement hybrid meter reached the vessel at its next scheduled port call. The ship’s electrician completed the physical panel installation and loop wiring within 20 minutes.
- Safety Restored: The control dashboard regained its real-time digital current display, restoring standard safety visibility and clearing the engine room’s operational status.
- Customer Voice: “Honestly, finding a legacy hybrid meter with the exact scale profile we needed while on tight port timelines was a lifesaver. The module dropped into the existing panel cutout perfectly, and the digital display and backlight are crystal clear.”
Case 2: Multi-Axis Compression Loop Maintenance at a Chemical Facility
Situation:
A chemical processing plant in Central Europe uses an integrated instrumentation panel to track main line discharge pressure on its heavy gas compressor systems. The console panel relies on vintage Yokogawa Model 2302 indicators configured with a -32 VLE 2 suffix array to track raw 4-20mA process loops from line transmitters.
Task:
During a routine inspection, maintenance noticed that one of the critical pressure gauges was experiencing severe segment fading on its digital LCD display, and the internal analog scale backlight had failed completely. The operators could no longer verify pressure fluctuations from a distance, which compromised safety during high-throughput production runs.
Action:
The plant’s procurement team reached out to us to secure a clean, authentic replacement without paying for an expensive panel redesign. We provided an un-used New Surplus card matching the precise suffix code, confirming the internal circuit boards were factory-original and had never been refurbished or field-patched.
Result:
- Simple Replacement: The plant scheduled a brief 30-minute maintenance window over the weekend to drop in the new meter. The unit aligned perfectly with the existing panel slots and terminal layouts.
- Capital Efficiency: By swapping the failing indicator with an original surplus module, the plant avoided the costly alternative of upgrading the entire panel array to a newer product line, keeping their legacy systems running smoothly.
Part 6: Frequently Asked Questions (FAQ)
Q1: What does the suffix code “-32 VLE 2” represent on this Yokogawa meter?
A: The suffix code defines the factory-configured input specifications, internal calibration curves, and scale markings printed on the dial plate.
Specifically, it sets up the meter to work with standard industrial analog loops (such as 4-20 mA or 0-1 mA DC) and configures the faceplate layout for specific digital scale ranges (e.g., 0-315 A \times 10). Always cross-reference this full suffix against your old unit’s nameplate to ensure the displays line up perfectly.
Q2: Can I use this meter with a 4-20 mA current loop without an external power supply?
A: No, this is an electronic hybrid panel meter that requires an independent 24 V DC auxiliary operating power supply to run its internal digital processing circuits and LCD backlight.
It cannot operate solely off the low-power current loop like traditional passive analog meters. Make sure your panel wiring includes both the 24 V DC power lines and the incoming 4-20 mA signal wires.
Q3: My application uses a 0-300 bar pressure range, but your stock lists an amp rating scale. Can I swap the faceplate?
A: Mechanically, the faceplates can be carefully swapped, but we don’t recommend it for legacy units unless it’s handled by an instrument calibration specialist.
The underlying digital scaling circuitry is factory-programmed to match the specific faceplate markings. If you put a pressure scale faceplate onto a unit configured for an amp scale, the internal calculations won’t line up correctly, leading to distorted process readings on your control panel.
Q4: Why pick a New Surplus Yokogawa meter over a cheaper refurbished option online?
A: Refurbished meters often come from salvaged industrial scrap. Third-party repair shops usually just swap out the failed backlight or clean the plastic windows, leaving old internal capacitors and faded LCD panels in place.
For critical monitoring lines, an aged component can fail unpredictably due to thermal stress. Our New Surplus units are authentic, un-used inventory that have been stored in climate-controlled environments. They give you factory-original component lifespans and a full 12-month warranty without the risks of refurbished hardware.
Q5: How do you verify that the calibration hasn’t drifted during storage?
A: Every 2302-32-VLE-2 meter undergoes a rigorous testing process on our automated calibration benches before it leaves our facility. We connect the unit to a stable 24 V DC power source and use an adjustable current generator to test multiple points across the 4-20 mA scale (0%, 25%, 50%, 75%, and 100%).